The users within the Setup module for a Client will include the users of the application irrespective of the Category to which they belong. Choosing the Users option displays the list of all the users that have been already created. Users will be categorized based on the Status. Active and Deactivated users list can be viewed by selecting the corresponding options. Details of each of these users can be modified on deleted using the Edit and Delete links provided against the user.
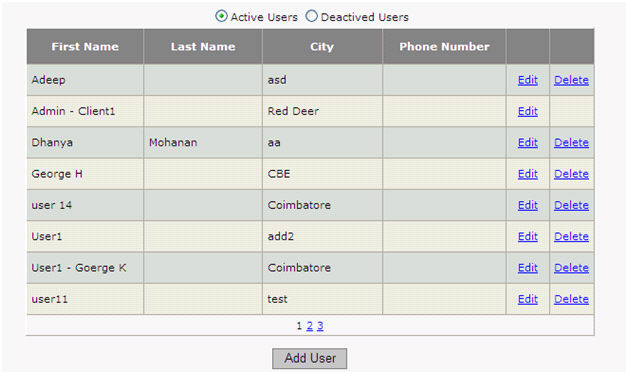
Clicking on the Add User button will allow the addition of a new user by providing the details for the same.
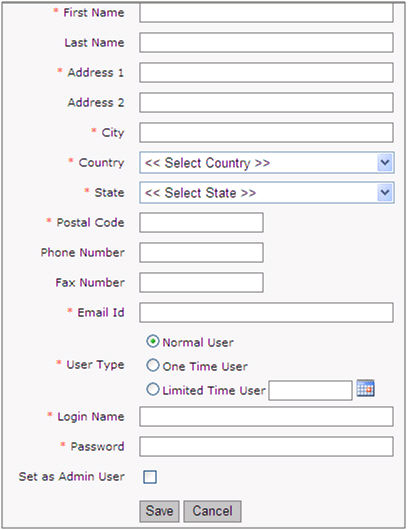
The different fields of entry for the creation of a new user will include the following:
# |
Field Name |
Description |
1 |
User Category |
Select the Category of the users from the list available in the drop down. This is a default list of the user categories that are available. |
2 |
Category Reference |
Category reference based on the User Category to which they belong. |
3 |
First Name |
First name of the user |
4 |
Last Name |
Last name of the user |
5 |
Address 1 |
Address details of the Client |
6 |
Address 2 |
Address details of the Client continued. |
7 |
City |
City to which the user belongs. |
8 |
Country |
Country to which the user belongs. This is selected from the drop down list of all the states created in the State Master. |
9 |
State |
State to which the Client belongs. This is selected from the drop down list. The state list is populated based on the country selected. |
10 |
Postal Code |
Postal code of the Client |
11 |
Phone Number |
Phone Number of the Client |
12 |
Fax Number |
Fax Number of the Client |
13 |
Email ID |
Email ID of the Client |
14 |
User Type |
User Type in general here are classified into three:
If the created user is a limited time user, then the date until which the user is active needs to be provided by selecting the same date from the calendar icon. |
15 |
Login Name |
Username of the client. This is the name that the client would use to login into the TAGS application. |
16 |
Password |
Password of the client. |
17 |
Set as Admin User |
Checkbox against this option indicate that the currently created user would be an Admin user. |